Bath Installation Instructions
Typical Tools - Adjustable spanner, screwdriver, cloth, hacksaw, spirit level
Materials - Silicone, PTFE plumbers tape, waste pipes, wood for leg support
The most trade skilled aspect of how to install a bath will be the installation or extension of the water supply and drainage pipes. While these bath installation instructions will help to give an overview of how to install a bath they should not be used in place of the manufacturers bath installation instructions. Please seek advise from a trained plumber regarding a bath installation. Also, the order of the steps may vary to suit each project.
Step 1: Preparation
- Minimise disruption - If the property is currently being used then you will want to minimise the amount of time that the water is disconnected during the bath installation. This can be achieved by connecting as many fittings onto the new bath as possible before removing the old bath. Some companies, such as Di Vapor will provide the bath with all of the taps, mixers, jets, overflow and drainage pipes already pre-installed. This greatly decreases the bath installation time and reduces both the installation costs and steps required.
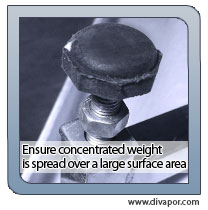
- Strengthen Flooring - With 1 litre of water weighing 1Kg the Varda whirlpool bath from Di Vapor, for example, would weigh 284Kg when in use (125Kg water + 84Kg avg. human male + 75Kg bath). To support the filled weight of the bath it may be advisable to strengthen your bathroom floor using 19mm plywood sheets underneath the bath.
In addition, it is strongly recommended to use a piece of wood underneath each pair of legs to spread the weight (that is concentrated on the bath legs) over a larger surface area. You would not want to pay an untimely visit to your family in the room below while in the middle of a bath!
Bath installation instruction steps 2-4 each relate to the preparation of the bath tub itself. Please note, your installation may not require each of the following steps.
Step 2: Connect support frame and Legs
- Protect the bath - It is recommended that you leave the bath in its original packaging where possible to avoid scratches to the surface of the bath. Carefully turn the bath over and place on a dust sheet. Depending on the weight of the bath, this may require two people.
- Fit the legs - Follow the manufacturers bath installation instructions to connect the legs to the base of the bath. The legs will usually be bolted into position at pre-determined, marked positions. Pay careful attention to the positioning of the bath legs when you install a bath as they will have a huge weight placed upon them when the bath is filled with both the user and water.
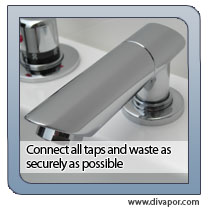
Step 3: Connecting Taps
The bath should have pre-drilled holes for the taps and/or mixer valve. Make sure that you fit any rubber washer that has been provided between the tap and the bath surface to prevent water leakage. Place the taps, along with the washers through the hole in the top surface of the bath. The taps may include a strengthening plate that should be placed on the underside of the bath.
Position any additional washers that have been provided before tightening the nuts that will hold the taps into position. It is important to carefully follow any bath installation instructions when fitting the taps. Once the taps have been connected you can secure a flexible braided hose to both the hot and cold water taps or mixer valve.
Step 4: Connecting Overflow & Drainage
- Overflow - Place the overflow pipe through the overflow hole that is located near the top of the bath. Connect the pipe to the finishing plate with the fixings provided. Ensure that you use any rubber washers provided. If no washers are provided you can run a bead of silicone between the connecting pieces. Use the adjustable spanner with a cloth to protect the chrome finish and gently tighten.
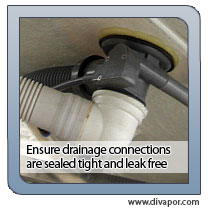
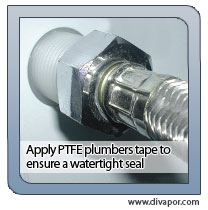
- Drain and Trap - Apply a bead of silicone and push the metallic drain cover through the drainage hole, making sure to create a water-tight seal. Fix the drainage pipe to this metallic drain cover on the underside of the bath using the fixings provided. Use silicone or plumbers PTFE tape around the thread of both the waste trap connector and overflow pipe connector. Screw on the waste trap and overflow pipe. When you install a bath trap and overflow, make sure that both connections provide a water-tight seal.
Step 5: Installing Pipework
- Manoeuvring - When choosing a bath make sure that there is sufficient space to manoeuvre the bath through the hallways and doorways to the bathroom.
- Marking Feeds - Is the bath's new location different to its old location? In this case it may be necessary that pipes will require moving or extending. Once you have chosen the bath and determined its final resting position, measure and use a pencil to mark the positions of the hot and cold water supply points along with the drainage location on the floor and wall. Some baths come with a radio, underwater lights or water/air massage jets that will require an electrical feed. The position of this feed can also be marked.
- Removing old Bath - Firstly, turn off the water using a dedicated ball-lever valve if available or using the stopcock for the property. Drain excess water by running a tap. Disconnect water from the existing bath. If necessary, cut through the old pipes.
- Installing Pipes & Electrics - In most scenarios the pipes can be moved without too much difficulty. Install new 22mm piping as necessary. These pipes will connect to the flexible braided hoses that should already be connected to the bath taps. Pipe installation should be done before placing the bath into position. Choosing flexible pipes and connectors can make pipe installation easier.
 Step 6: Positioning & Levelling the Bath
- Positioning - Lift the bath into position, ensuring you have support underneath the legs to spread the weight of the bath. When installing a bath, check that the bath does not sink or move when filled with water as this may pull the silicone away from the wall.
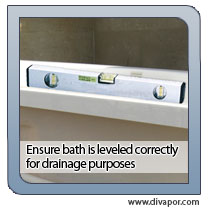
- Levelling - Check the level of the bath with a spirit level placed on each side of the bath. To help level the bath you could draw a straight pencil line on the wall using your spirit level to guarantee a horizontal line. Adjust the legs to get the bath level. Ensure that all legs are touching the floor. Once level, tighten the locking nuts on each adjustable leg.
Step 7: Connecting Water & Sealing
- Connect supplies - Connect the braided hoses to the hot and cold water supply pipes. Also connect the flexible waste pipe into the pre-installed bathroom drainage pipes.
- Fill with Water - Fill the bath with water to a point just over the overflow level and check for leaks at all pipe joints. Also, pay special attention when checking the overflow pipe connections.
- Sealing - Ideally, once you install a bath use it once before tiling and sealing the sides. Make sure that the bath does not wobble on its legs and that it does not move on the wooden support. This will also ensure that the sealant will not be pulled away from the wall when the user and water is in the bath. Make sure the bath and adjacent wall are both clean and free from debris and dust. Apply the silicone using a standard sealant gun and smooth using a finger or the handle of a tea-spoon to get a flush water-tight finish.
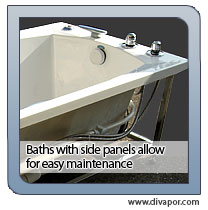
Step 8: Reconnecting Bath Skirt
Finally, re-connect the skirt of the bath using the fixing screws and caps provided. Congratulations. you should now have a fully installed bath ready to be enjoyed. For additional information about how to install a bath please refer to the original bath installation instructions.
|